Get ready to impress your friends and family with Peppermint Candy Cane Cupcake Cones! These festive treats combine the fun of cupcakes with the joy of ice cream cones. They are easy to make and perfect for holiday parties or cozy nights at home. Let’s dive into the delicious details, from essential ingredients to simple step-by-step instructions. You’ll have a treat that tastes as good as it looks!
Why I Love This Recipe
- Festive Flavor: The combination of peppermint and vanilla creates a delightful holiday taste that’s perfect for celebrations.
- Fun Presentation: Serving cupcakes in ice cream cones adds a playful twist that’s sure to impress guests of all ages.
- Easy to Make: With simple ingredients and straightforward steps, these cupcake cones are a breeze to whip up.
- Customizable: You can easily adapt the frosting and toppings to match your personal preferences or any holiday theme.
Ingredients
Essential Ingredients for Peppermint Candy Cane Cupcake Cones
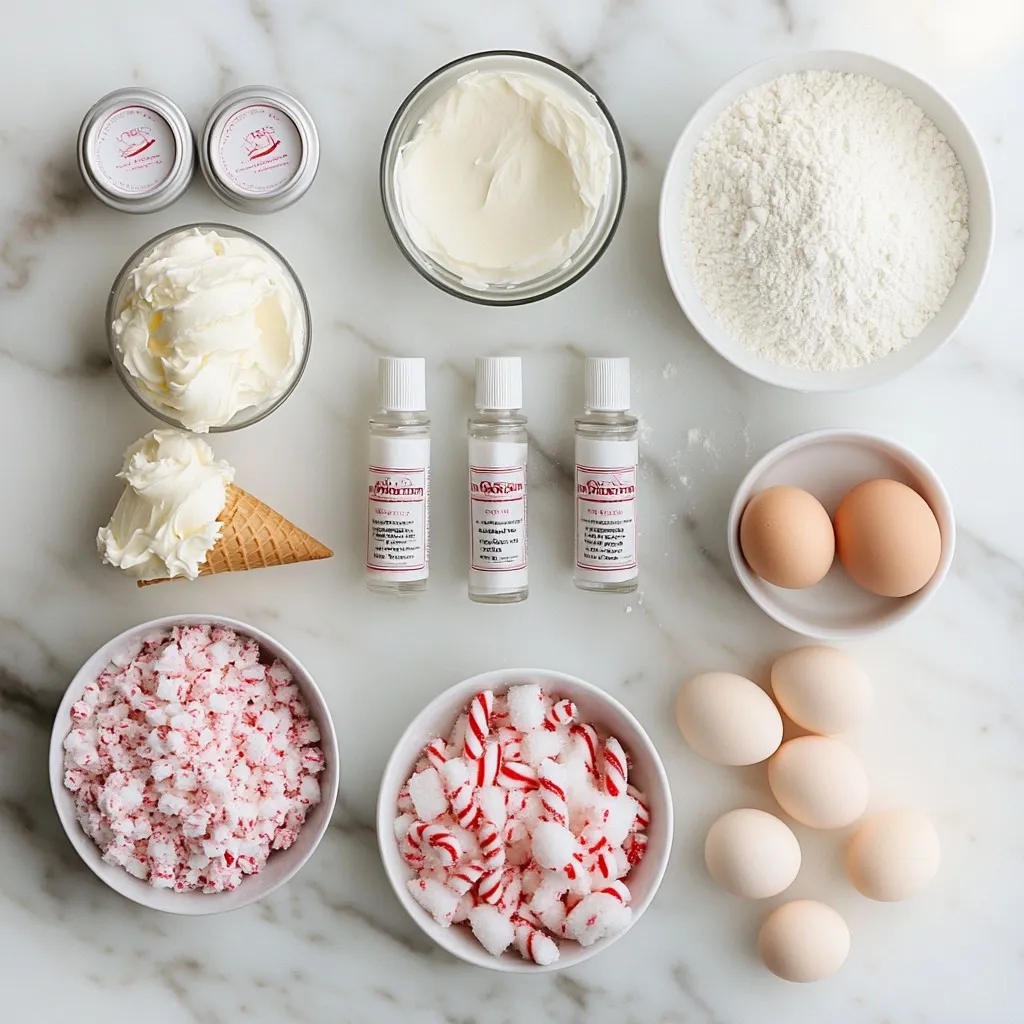
To make these fun and festive cupcake cones, gather these key ingredients:
– 1 cup all-purpose flour
– 1/2 cup granulated sugar
– 1/2 teaspoon baking powder
– 1/4 teaspoon baking soda
– 1/4 teaspoon salt
– 1/2 cup unsalted butter, softened
– 2 large eggs
– 1/4 cup sour cream
– 1 teaspoon vanilla extract
– 1/2 teaspoon peppermint extract
– 1/2 cup crushed candy canes (plus extra for garnish)
– 12 ice cream cones
These ingredients create a soft and delightful cupcake batter with a tasty peppermint twist.
Optional Ingredients for Decoration
For an extra special touch, consider these optional decoration items:
– Additional crushed candy canes
– Festive sprinkles
– Miniature peppermint sticks
– Edible glitter
These items add color and fun to your cupcake cones, making them even more appealing.
Key Substitutions for Allergens
If you have allergies or dietary needs, here are some substitutions:
– Use gluten-free flour instead of all-purpose flour.
– Replace eggs with unsweetened applesauce or flaxseed meal mixed with water.
– Swap sour cream with a dairy-free yogurt or silken tofu.
– Use dairy-free butter for a dairy-free version.
These substitutions keep the festive spirit while accommodating different diets.
Step-by-Step Instructions
Preparation and Preheating
Start by preheating your oven to 350°F (175°C). Next, prepare a cupcake pan with liners, or use metal cupcake cones. This will hold the cones upright while they bake.
Mixing the Batter
In a large bowl, whisk together these dry ingredients:
– 1 cup all-purpose flour
– 1/2 cup granulated sugar
– 1/2 teaspoon baking powder
– 1/4 teaspoon baking soda
– 1/4 teaspoon salt
In another bowl, cream 1/2 cup unsalted butter until fluffy. Add 2 large eggs, one at a time. Mix well after each egg. Now, stir in:
– 1/4 cup sour cream
– 1 teaspoon vanilla extract
– 1/2 teaspoon peppermint extract
Gradually add the dry mix to the wet mix. Stir until just combined. Be careful! Overmixing can ruin the texture. Finally, fold in 1/2 cup crushed candy canes.
Filling and Baking the Cones
Carefully pour the batter into the cones. Fill them about two-thirds full. This leaves room for the cupcakes to rise. Place the filled cones in a muffin tin to keep them steady in the oven. Bake for 18-20 minutes. Check if they are done by inserting a toothpick. If it comes out clean, they are ready! Let them cool in the pan for 10 minutes. After that, move them to a wire rack to cool completely.
Frosting and Decorating
Once the cones are cool, frost the tops generously with your favorite frosting. You can use store-bought or homemade frosting. To make them extra festive, sprinkle more crushed candy canes on top. For a fun display, serve the cupcake cones on a decorative platter or in a tall jar filled with sugar. You can even add a small festive flag or a peppermint stick to each cone for a special touch!
Tips & Tricks
How to Achieve the Perfect Cupcake Cone Texture
To get a great texture in your cupcake cones, start with room-temperature ingredients. This helps the batter mix well. When you mix the batter, do not overdo it. Just mix until it’s combined. Overmixing can make your cupcakes tough. Fill the cones two-thirds full to give them room to rise. Bake until a toothpick comes out clean, usually 18 to 20 minutes. Let them cool in the pan for about 10 minutes. Then, move them to a wire rack to cool completely.
Storing Leftover Frosting
If you have frosting left over, store it in an airtight container. You can keep it in the fridge for up to a week. When you are ready to use it again, take it out and let it sit at room temperature for about 30 minutes. This will make it easier to spread. If it seems too stiff, you can beat it briefly to make it smooth again.
Decorating Ideas for Festive Presentation
For a fun and festive look, you can add more crushed candy canes on top of the frosting. This adds color and crunch. You can also stick a small peppermint stick or festive flag into the frosting. For a nice display, serve the cones on a decorative platter or in a tall jar filled with sugar. This makes them look extra special and fun for any holiday gathering.
Pro Tips
- Use Room Temperature Ingredients: Make sure your butter and eggs are at room temperature for a smoother batter and better rise.
- Don’t Overmix the Batter: Mix until just combined to keep the cupcakes light and fluffy; overmixing can lead to dense cupcakes.
- Customize the Frosting: Experiment with different flavors of frosting, like chocolate or cream cheese, to complement the peppermint.
- Serve with a Twist: For added fun, serve the cones in a jar filled with sugar, mimicking a snow-like effect for a festive presentation.
Variations
Alternative Flavors and Mix-Ins
You can easily change the flavor of these cupcake cones. Try vanilla or chocolate instead of peppermint. For a fun twist, add mini chocolate chips or chunks of toffee. You can even mix in different candies, like M&Ms or sprinkles, for added color and crunch.
Gluten-Free and Vegan Adaptations
To make these cones gluten-free, use a gluten-free flour blend. For a vegan version, substitute eggs with flax eggs and butter with a plant-based alternative. Use a dairy-free frosting to keep it vegan-friendly. These swaps keep the fun without losing flavor or texture.
Seasonal Variations for Different Holidays
These cupcake cones can fit any holiday! For Halloween, use orange and black sprinkles with a pumpkin spice flavor. In spring, try lemon zest with pastel decorations. For Valentine’s Day, use strawberry flavor and pink frosting. The options are endless—be creative!
Storage Info
Best Practices for Storing Cupcake Cones
Store your peppermint candy cane cupcake cones in an airtight container. This keeps them fresh and moist. If you stack them, add parchment paper between layers. This prevents sticking. Keep them at room temperature for the best taste. Avoid placing them in direct sunlight or heat.
Freezing Instructions for Prepared Cones
To freeze your cupcake cones, let them cool completely first. Wrap each cone tightly in plastic wrap. Place the wrapped cones in a freezer bag. They will stay fresh for up to three months. When you’re ready to enjoy them, thaw in the fridge overnight. Frost them after thawing for the best results.
Shelf Life for Disassembled Ingredients
Most of the ingredients can last for a long time if stored right. All-purpose flour can last for up to a year in a cool, dry place. Sugar and baking powder have a shelf life of about six months. Keep eggs in the fridge for about three to five weeks. Sour cream lasts about a week after opening. Always check expiration dates to ensure freshness.
FAQs
Can I make the batter ahead of time?
Yes, you can make the batter ahead of time. Just cover it and store it in the fridge. Use it within 24 hours for best results. When ready, fill your cones and bake them.
How long do the cupcake cones stay fresh?
The cupcake cones stay fresh for about 2 to 3 days at room temperature. Store them in an airtight container. If you want them to last longer, place them in the fridge.
What can I use instead of peppermint extract?
You can use vanilla extract as an alternative. Almond extract also works well for a different flavor. Just remember, it will change the taste a bit.
Can I use homemade frosting?
Absolutely! Homemade frosting adds a personal touch. Just make sure it is thick enough to hold its shape. You can flavor it with more peppermint or chocolate for added fun.
In this post, we covered how to make delicious peppermint candy cane cupcake cones. We looked at essential ingredients, detailed steps, and handy tips. You learned about fun variations and proper storage methods. These cupcakes are perfect for any festive occasion and easy to make. Try your own flavors and decorations to make them unique. Enjoy the process and have fun with your bakin