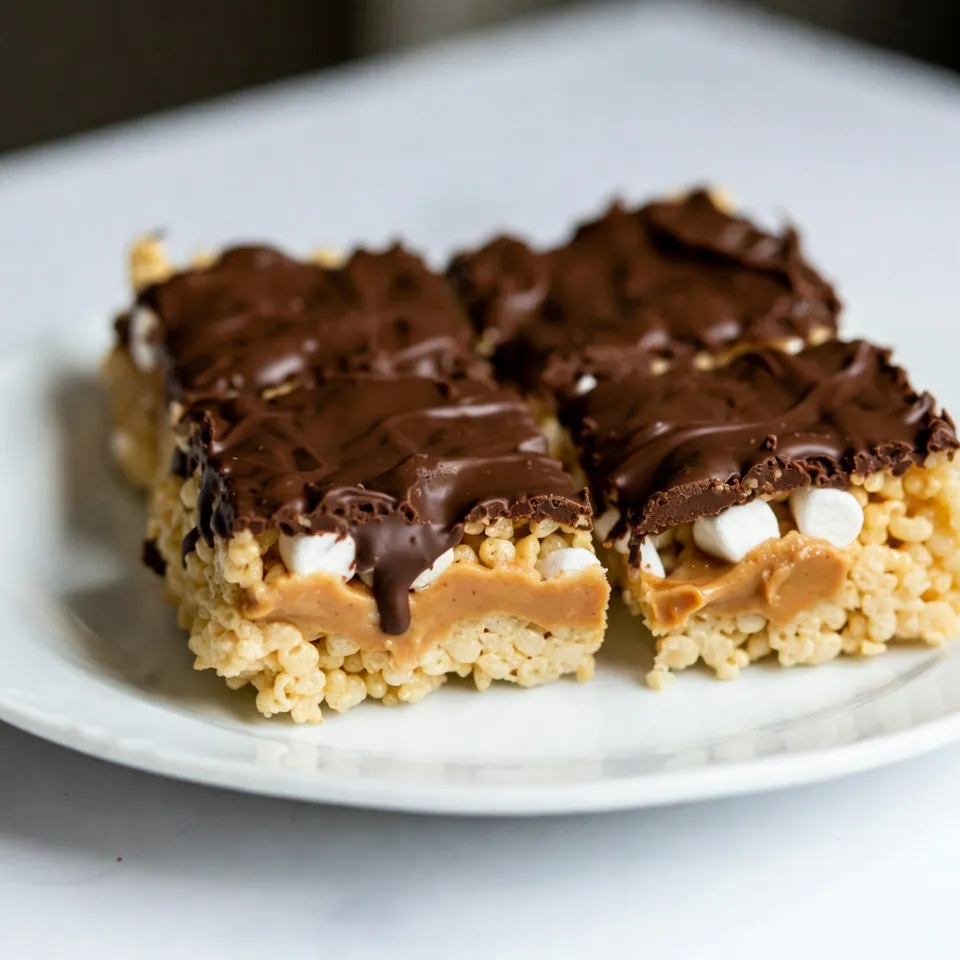
Welcome to the sweet world of Chocolate Peanut Butter Rice Krispie Squares Delight! If you love quick and tasty treats, this recipe hits the mark. With just a few simple ingredients, you can create a chewy and crunchy delight that melts in your mouth. Ready to impress your family and friends? Let’s dive into the easy steps and tips to make this delicious snack!
Why I Love This Recipe
- Quick and Easy: This recipe takes just 10 minutes to prepare, making it a perfect treat for busy days or last-minute gatherings.
- Deliciously Indulgent: The combination of chocolate and peanut butter is a classic match that never disappoints.
- Customizable: Add mini marshmallows for extra chewiness or experiment with different types of chocolate for a unique twist.
- Perfect for Sharing: Cut into squares, these treats are ideal for parties, picnics, or just sharing with friends and family.
Ingredients
Essential Ingredients
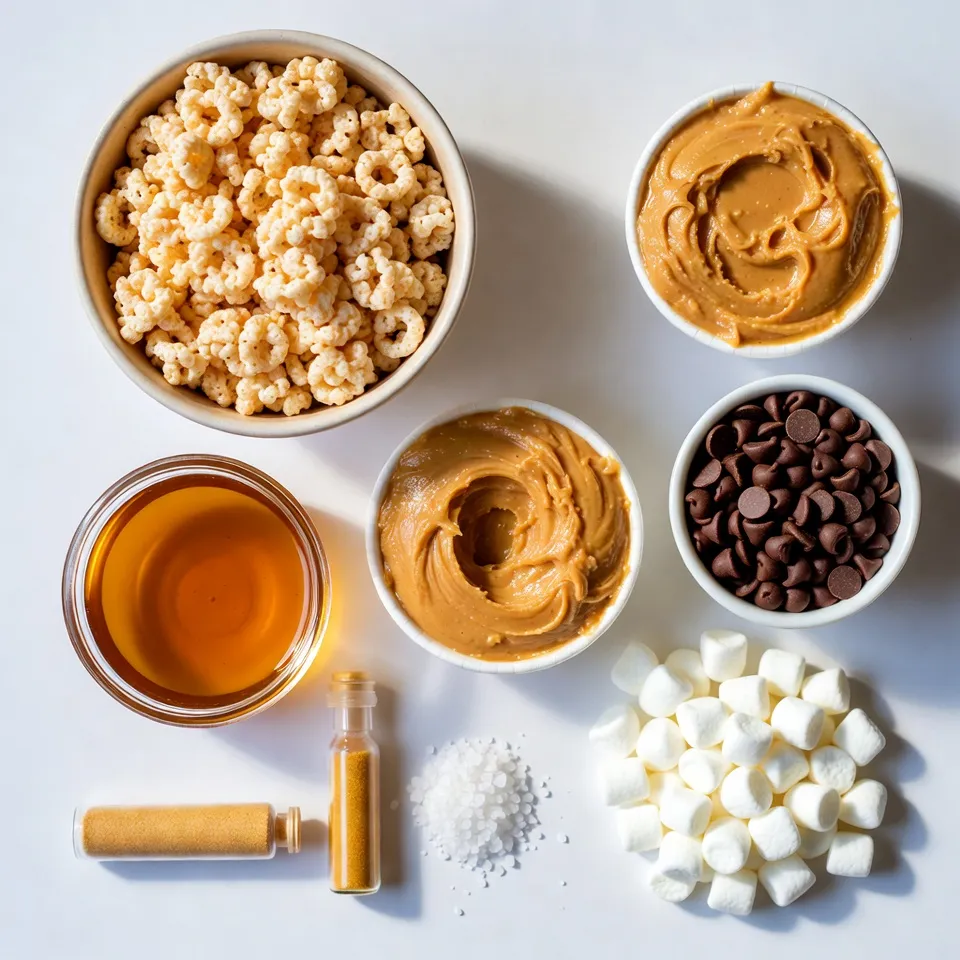
– 3 cups Rice Krispies cereal
– 1 cup creamy peanut butter
– 1 cup chocolate chips (milk or dark)
– ½ cup honey or maple syrup
Optional Ingredients
– 1 teaspoon vanilla extract
– A pinch of salt
– ½ cup mini marshmallows (for extra chewiness)
When making Chocolate Peanut Butter Rice Krispie Squares, you need a few key ingredients. The Rice Krispies cereal gives the squares a crunchy texture. Creamy peanut butter adds a rich taste and helps bind everything together. Chocolate chips are a must for that sweet, chocolatey layer on top.
Honey or maple syrup acts as a sweetener. You can choose one based on your taste. If you want to enhance the flavor, add vanilla extract. A pinch of salt can balance the sweetness, making each bite better. If you like chewiness, mini marshmallows are a fun option.
These ingredients work together to create a treat that is both tasty and easy to make. You can find them in most grocery stores. Remember, quality matters! Use fresh ingredients for the best results.
Step-by-Step Instructions
Preparatory Steps
1. Start by making the peanut butter mix. In a medium saucepan, add 1 cup of creamy peanut butter, ½ cup of honey or maple syrup, and a pinch of salt. Heat this over low heat. Stir it well until the mix is smooth and melted. This step gives the squares their rich flavor.
2. Once the mix is smooth, remove it from heat. Now, add 1 teaspoon of vanilla extract. Stir again until everything blends nicely. This adds a lovely aroma to your squares.
Mixing the Base
3. Grab a large mixing bowl. Pour in 3 cups of Rice Krispies cereal. If you like a little extra chewiness, add ½ cup of mini marshmallows to the cereal. Gently mix them together. The marshmallows add a fun texture.
4. Next, pour the warm peanut butter mixture over the Rice Krispies. Use a spatula to stir it all together. Make sure every piece of cereal is coated well. This helps keep the squares together.
5. Now, take a greased 9×9-inch baking pan. Press the mixture firmly into the pan. Spread it out evenly. Packing it tightly helps the squares hold their shape.
Final Assembly
6. For the chocolate layer, melt 1 cup of chocolate chips in a microwave-safe bowl. Do this in 30-second bursts, stirring in between. Keep going until the chocolate is smooth.
7. Pour the melted chocolate over the Rice Krispie mixture. Use a spatula to spread it evenly. This chocolate layer adds sweetness and makes your squares look nice.
8. Let your squares cool for at least 30 minutes. You can also speed this up by placing them in the refrigerator. Once set, cut them into squares. Now they are ready to enjoy!
Tips & Tricks
Perfecting the Texture
To make your Chocolate Peanut Butter Rice Krispie Squares perfect, you need to press the mixture well. After you mix the Rice Krispies with the peanut butter, use a spatula or your hands to pack it tightly into the pan. This helps the squares hold their shape when cut.
Choosing the right chocolate is also key. I like to use milk chocolate for a sweet touch or dark chocolate for a rich flavor. Melt it slowly in the microwave, stirring often. This way, it stays smooth and creamy.
Serving Suggestions
Presentation matters! I suggest placing the squares on a pretty plate. You can sprinkle extra chocolate chips or crushed peanuts on top. This adds a nice touch and makes them look fancy.
Pair these treats with a cold glass of milk. They go well together! You can also serve them with coffee or tea. The sweet flavors balance really well.
Common Mistakes to Avoid
One big mistake is overheating the peanut butter. Heat it on low and stir constantly. If it gets too hot, it can separate and become oily.
Another mistake is not cooling the squares long enough. Let them cool for at least 30 minutes. If you rush this step, they may fall apart when you cut them. Patience pays off!
Pro Tips
- Use Fresh Ingredients: Ensure your peanut butter and chocolate chips are fresh for the best flavor and texture.
- Customize Your Mix-ins: Feel free to add nuts, dried fruit, or other mix-ins for added flavor and texture.
- Cooling Time Matters: Allow the squares to cool completely for the best cutting results; warm bars may crumble.
- Storage Tips: Store in an airtight container at room temperature or refrigerate for longer shelf life.
Variations
Flavor Variations
You can easily change the taste of your Chocolate Peanut Butter Rice Krispie Squares. One fun way is by adding nuts or seeds. Chopped almonds, walnuts, or sunflower seeds give great crunch and flavor. They also add healthy fats and protein. Try mixing in about ½ cup of your favorite nuts or seeds for a tasty twist.
Another option is to use different flavored chocolate. You can swap out milk chocolate for dark or white chocolate. Each type brings its own unique taste. For a fun twist, try mint or orange-flavored chocolate. Just melt it the same way and pour it over your squares.
Dietary Modifications
If you’re looking to make these squares gluten-free, simply check your Rice Krispies. Many brands are now gluten-free! Always read the label to be sure. You can also replace honey or maple syrup with agave syrup if you prefer.
For vegan options, choose dairy-free chocolate chips. You can use almond butter or cashew butter instead of peanut butter. This keeps the flavor while making it vegan-friendly.
Serving Options
You can serve these squares in fun ways! Cut them into mini bars or bites for a party. They are perfect for sharing! For a layered dessert, try adding a layer of whipped cream or ice cream on top. You can even stack them with other treats like brownies or cheesecake.
These simple variations let you create a unique treat every time!
Storage Info
Storing Leftovers
To keep your Chocolate Peanut Butter Rice Krispie Squares fresh, store them in an airtight container. This helps keep them chewy and tasty. You can layer squares with parchment paper to prevent sticking. They will stay fresh for about 5 days at room temperature. If you want to extend their life, consider placing them in the fridge, where they can last up to 10 days.
Freezing Guidelines
If you want to freeze these treats, first cut them into squares. Wrap each square tightly in plastic wrap. Then place them in a freezer-safe bag or container. They can stay in the freezer for about 3 months. When you’re ready to enjoy them, take them out and let them thaw in the fridge or at room temperature. This keeps them soft and delicious.
FAQs
How long does it take to make Chocolate Peanut Butter Rice Krispie Squares?
Making these squares is quick and fun! You need about 10 minutes to prep. The total time is around 40 minutes. This includes the time to let them cool. Most of the time is just waiting for the squares to set. Perfect for a sweet treat in no time!
Can I use crunchy peanut butter instead of creamy?
Yes, you can use crunchy peanut butter! It gives a nice texture. You will get little bits of peanuts in every bite. This adds a fun crunch to the squares. The flavor stays the same, but the texture changes. If you love that crunch, go for it!
What can I substitute for honey or maple syrup?
If you don’t have honey or maple syrup, don’t worry! You can use agave nectar or corn syrup. Both will work well in this recipe. They add sweetness and help bind the mixture. Just keep in mind that the flavor might change slightly. But the squares will still be tasty!
We covered the key ingredients for Chocolate Peanut Butter Rice Krispie Squares and how to make them. The simple steps and handy tips can help you create a delicious treat with ease. Remember, you can mix up flavors or make dietary swaps to suit your needs. These bars are great for sharing or storing for later. Enjoy your tasty creations, and don’t forget to try new variations for fu